Lawn and Landscape Blog

Pine bark beetles

Pine bark beetles

Click Here To Download Pine bark beetles

Pine bark beetles

DESCRIPTION

There are numerous species of Ips Engraver and Dendroctonus, Bark Beetles, that infest conifers throughout North America. Adults tunnel through the bark, mate and lay eggs in the phloem (inner bark). The larvae develop in the phloem and cambial region; pupal development is completed in the inner or outer bark. Adults develop from pupae and emerge by boring out through the bark. Multiple generations a year are possible

SYMPTOMS

Symptoms of infestation include: pitch tubes, reddish boring dust, adult exit holes, and yellowing foliage. The beetles commonly attack drought stressed trees. High number of attacks to trees are possible, which can result in extensive vascular injury and ultimately, tree death.

TRE ATMENT

TREE-äge ® Insecticide (containing 4% Emamect in  Benzoate ) is the recommended treatment for Bark Beetles including Ips Engraver Beetles, Mountain Pine Beetles, Southern Pine Beetles, Spruce Beetles and Western Pine Beetles. TREE -äge provides 2 years of control for labeled Bark Beetles. The TREE I.V. system is recommended for treating Bark Beetles due to the nature of the host trees.

Dosages are based on the Diameter (in inches) of the tree at Breast Height (DBH”). Resinous Conifers: In resinous conifers, such as pine and spruce, start the injection immediately after drilling into the sapwood. A prolonged delay may reduce uptake on account of resin flow into the opening.

WHEN TO TREAT

Effective injection treatment is favored by a full canopy (i.e., leaves) and a healthy vascular system. Once these tissues are compromised by insect damage (adult and larval galleries) an effective and uniform application of TREE-äge may be difficult to achieve and subsequent control may be poor. Optimally, treatment should be made preventively at least 2 to 3 weeks before Bark Beetles historically infest the host tree.

TREE-äge may also be effective as a remedial treatment against some pests, such as those with slower development or if multiple life stages are susceptible to TREE-äge

WHAT TO EXPECT AFTER TREATMENT

Research studies using TREE-äge (containing 4% Emamectin Benzoate) have demonstrated effective results against conifer bark beetles, depending on the pest species targeted. You can expect TREE-äge to be systemically distributed throughout the tree and provide protection from Bark Beetle pests for up to 2 years.

REFERENCES

1 Effectiveness of Two Systemic Insecticides for Protecting Western Conifers from Mortality Due to Bark Beetle Attack: Don M. Grosman, Christopher J. Fettig, Carl L. Jorgensen, and A. Steven Munson, Western Journal of Applied Forestry 25(4) 2010

2 Efficacy of Systemic Insecticides for Potection of Loblolly Pine Against Southern Pine Beetles (Coleoptera: Cuculionidae: Scolytinae) and Wood Borers (Coleoptera: Cerambycidae) Donald M. Grosman and William W. Upton Journal of Econ. Entomol. 99 (1): 94-101 (2006)

Read more...
Chlorosis on Trees

Chlorosis on Trees

Click Here To Download Chlorosis on Trees

Chlorosis on Trees

DESCRIPTION

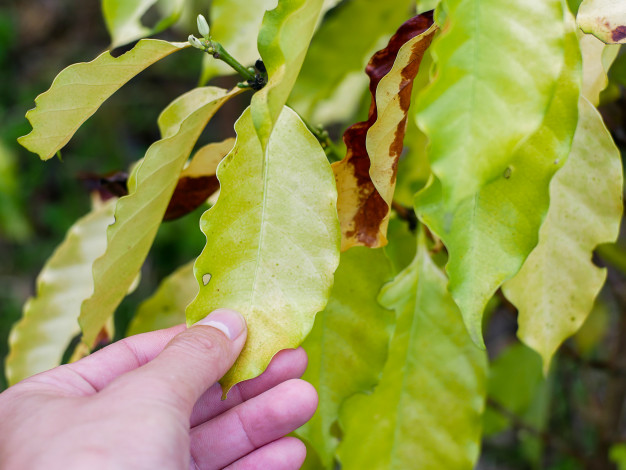
Iron or manganese chlorosis (interveinal  chlorosis) describes a condition in which a tree’s foliage loses its healthy green color and fades to a pale green or yellow hue. This condition if allowed to progress will cause slow growth, leaf loss and eventually tree death. Chlorosis is often caused by deficiencies of the micro-elements iron and manganese, and is particularly prevalent in oak. In alkaline soils, iron and manganese become insoluble and unavailable to the tree. Trees growing in poorly drained soils are also susceptible to iron chlorosis

SYMPTOMS

The primary symptom is the fading of the leaf color from green to increasingly paler shades of green and, when extreme, to an almost yellow tone.

TRE ATMENT

Arborjet recommends a two-pronged approach to treating foliar chlorosis.

1)Trunk InjectionBy injecting minerals which are deficient in the tree directly into the xylem tissue, these minerals available to the tree immediately; thus, it is the fastest way to alleviate symptoms of chlorosis and improve the health of the tree. In oaks and birches, use the QUIK-jet to apply MIN-jet Iron which is specially formulated for iron deficiency. By rapidly providing the minerals the tree needs, it is able to respond rapidly and generally will have darker, healthier leaves within days or weeks of application.

2) Soil ApplicationArborjet recommends a supplemental follow up application of ROOT-jet Iron, which can be applied as a soil drench, soil injection or foliar spray. ROOT-jet Iron is formulated to help acidify the soil and provide additional nutrients to aid recovery and long term health of the tree. The addition of high quality organic matter to improve soil CEC and to buffer pH is likewise recommended.


IRON CHLOROSIS WHEN TO TREAT

Generally, the best seasons for injection are fall and spring, as uptake occurs when trees are transpiring. The environmental conditions that favor uptake are adequate soil moisture and relatively high humidity. Soil temperature should be above 40°F for trunk injection. Hot weather or dry soil conditions will result in a reduced rate of uptake, so trees should be watered if applications are made when soil is extremely dry. If treating trees in the summer, inject in the morning for the quickest uptake. Tree health will affect treatment efficacy, so assess tree health prior to treating. For example, a declining tree (>50% canopy dieback) is a poor candidate for treatment.

For foliar chlorosis, the best time to treat is in the fall, following leaf coloration for foliage responses in the following growing season. When treating in the early spring or summer, use the lowest (micro-injection) label rates. Make applications prior to bud break in spring or, alternatively following leaf maturation (June 15). Always use the lowest label rates when treating birch trees.

WHAT TO EXPECT AFTER TREATMENT

Recovery will be proportional to the level of the severity of chlorosis at the time of treatment. Response to treatment can be very rapid; you can expect to see noticeable greening and improved vitality within the growing season and often within weeks of application. Tree responses vary with soil conditions. Calcitic soils with little organic matter require comprehensive approach to treatment, including soil amendments. At Arborjet, we stress the importance of being proactive. This means that it is imperative that you treat the disease, not only the symptoms. This is why we recommend the addition of ROOT-jet Iron to the soil in order to prevent the recurrence of iron chlorosis symptoms. With the proper assessment and amendment of soil conditions, the tree may not need to be injected again for several years.


Read more...
Types of Landscape Mulch Installation Springfield MO

Root Ball Myths

Click Here To Download Root Ball Myths

Linda Chalker-Scott, Ph.D., Extension Horticulturist and Associate Professor,
Puyallup Research and Extension Center, Washington State University

The Myth of Collapsing Root Balls
“Balled and burlapped root balls must be left intact during transplanting”

The Myth

While shopping for trees at my favorite nursery, we recently overheard another customer ask a staff person about installing her newly purchased B&B tree. “When I plant my tree I should take off the burlap and twine, right?” she asked. “Oh no,” exclaimed the staffer. “You don’t want to disturb the root ball. Just peel the burlap back from the trunk and leave the rest intact. Otherwise, the root ball will collapse and the tree will die.”

At first glance, this appears to be reasonable advice. Balled and burlapped, or B&B trees, are much heavier than containerized plants and one can visualize the root ball collapsing and crushing the root system. The weight of the root ball also helps stabilize the tree and prevent tilting or falling. Finally, the root ball soil contains beneficial microbes and other soil organisms that can help ease transplant shock to the root system. With these benefits in mind, why would you consider doing anything differently?

The Reality

Many nurseries will not guarantee their plant materials if the customer disturbs the root ball, so customers are loathe to do anything that might negate this policy. This is unfortunate, as disturbing the root ball is exactly what you want to do to maximize survival of your newly transplanted tree.

A previous column discussed how to transplant containerized plant materials properly, and some of the same issues apply to B&B trees as well. The most important reason to disturb the root ball of a balled and burlapped tree is to inspect the root system. The circling, girdling, kinked, and hooked root systems often found in containerized plants occur frequently with B&B materials, too. Nearly every B&B tree I have purchased and installed, either in my own landscape or as part of a project, has had serious root defects. By removing the heavy clay one can find and correct many of these defects. Without corrective pruning these defects will significantly lower the life span of your tree. Remember, root pruning stimulates the growth and development of new roots that will enhance tree establishment in the landscape.

A second reason to break up the root ball is to remove the clay soil that makes the tree so heavy in the first place. Most B&B trees are grown in a soil with clay characteristics so that when the tree is dug the root ball it will hold its shape: sandy soil will simply fall away from the roots. The clay soil not only maintains its shape but also retains water, so that B&B materials are usually more stable in terms of optimal water conditions during the time they are out of the ground. When the tree is planted into the landscape, however, the clay character of the soil is often different than that of the surrounding native soil. Differences between soil textures will impede water movement and therefore inhibit root establishment.

A final reason to remove the bagging materials and root ball soil is that many of the B&B specimens at the nursery have been burlapped too high during field digging and bagging. Burlap and soil that covers the trunk above the root crown will lead to trunk disease and death. In every nursery I’ve visited I have found more than one tree trunk literally rotting in the bag. Before purchasing any B&B stock you should ensure that a healthy trunk lives beneath the burlap.

 The best practice for transplanting B&B trees is relatively straight-forward. (The rationale for many of the practices listed below are detailed in previous B&B columns):
1) Remove all wire baskets, twine, and burlap from the root ball. Working on top of a tarp will allow you to transport the root ball remnants elsewhere.
2) Remove all clay from the root ball. This can be done most easily by using a water bath or a hose. Use your fingers to work out clumps of clay from between the roots.
3) Look for and prune out defects in your freshly denuded roots. Be sure to keep the roots moist during this procedure and work in the shade if possible.
4) Dig the planting hole to be only as deep as the root system and at least twice as wide. The hole will resemble a shallow bowl.
5) Form a soil mound in the center of the hole to support the root crown of the tree, and arrange the roots radially.
6) Backfill with native soil; do not use any type of soil amendment.
7) Water in well, preferably using the water from step 2 which will contain nutrients and microbes. Do not step on the root zone, but gently firm using your hands. Add an appropriate fertilizer (i.e. primarily nitrogen and little or no phosphorus)
8) Mulch the entire planting region with at least 4” of organic mulch, keeping a buffer between the trunk and the mulch to prevent disease.
9) Stake your tree low and loose with 3 stakes for no longer than one year after planting.
10) Keep your tree well watered during the first year of establishment. You may have removed a good portion of the root system and its ability to take up water and nutrients will be temporarily impaired. Do not succumb to the temptation to crown prune or add expensive, but pointless, transplant supplements.
This method is radically different from historically accepted practices. Yet recent and ongoing research demonstrates that bare-rooting B&B trees leads to substantial increases in tree establishment and survival. Investing the time to prepare and install trees properly will pay future dividends of reduced maintenance and mortality for the lifetime of your landscape.
The Bottom Line
    • Balled and burlapped plant materials usually contain soil significantly different than that of the transplant site.
    • Differences in soil texture will impede both water movement and root establishment.
    • Root defects can only be found and corrected if root ball soil is removed.
    • Proper root preparation combined with best practices for installation will greatly improve tree establishment and survival in any landscape.

For more information, please visit Dr. Chalker-Scott’s web page at http://www.theinformedgardener.com

Read more...
Additional Tree Disease Resources (2015) - Tree Service Company Springfield MO

Buying a Tree Handout

Click Here To Download Buying a Tree Handout

The 2 Most Important Considerations When Buying a Tree

1.)The Goal or Purpose of the Tree

What do you want out of your new tree? Is the tree’s purpose to provide shade or privacy? Is the tree just ornamental and for aesthetics? Are we trying to attract wildlife with the tree?

Different trees are used for shade versus privacy. Shade trees tend to be tall. Often times shade trees are deciduous as well. Oaks, Maples, Ash, and Poplar are all common types of shade trees. Privacy trees are typically evergreen. Privacy trees are often conifers as well. However, not all evergreens are conifers though. So sometimes a non-coniferous tree such as a holly or magnolia tree can be used for privacy due to their evergreen qualities.

Ornamental and Specimen trees are used strictly to enhance the look and diversity of a landscape. These can consist of many types of trees because they are not intended to cover a specific area for privacy or grow a certain height for shade. Often certain specimen trees can be planted to coincide with various wildlife. For example, a customer who enjoys watching the squirrels run around the yard would probably want to plant an oak, hickory, or walnut tree so that the nuts can attract more squirrels.

2.)Long-Term Maintenance of the Tree

How much trimming does each variety of tree require? Does the tree shed twigs or bark? What kind of fruit/nut/seed does the tree produce? What are the potential pest and disease problems with the tree?

It is going to take a significant amount of knowledge about various trees to answer these questions. We recommend that our customers consider the goal or purpose of their tree. Our goal is to help to educate customers on any long-term maintenance considerations so that they can make a quality decision on what trees they want to install. We typically address these considerations during one of our free estimate and consultation meetings. If you are in Springfield, Nixa, or Ozark, Missouri, just give us a call at (417) 837-1578. We can set everything up to guide you through the tree selection process.

If you are out of our area, we recommend you find a local ISA Certified Arborist. Go towww.isa-arbor.com and use the “Find an Arborist” tool to locate an Arborist in your area

Read more...

Shrub Plant Watering Practices

Click Here To Download Shrub Plant Watering Practices

How to Water Your New Shrubs and Plants

There are many exceptions to the following guidelines. Species specific research is encouraged for customers interested in the proper maintenance of their trees.

The #1 cause of death for new plants in urban landscapes is over watering. Over watering can push all of the oxygen out of the soil and actually choke a plant to death faster than under watering will kill the plant of dehydration. Be sure water is draining from your plant so it isn’t sitting in a puddle of water for an extended period of time after watering. Poorly draining soils will require much less water than outlined below

The key is to keep the soil around the root system moist, without drowning the plants. Touching the ground and feeling the soil moisture at the base of your plant is always the best way to determine watering needs. If the ground is really wet, don’t water. If the ground is really dry, consider watering more often or a few seconds longer than outlined below.

Avoid letting water splash on plant leaves if at all possible, particularly if watering after 8 a.m. The best time of day to water is between 4-8 a.m.

After the initial establishment, plants should be watered once or twice a month for the first 1-2 years, even during the winter, if/when weather permits, and especially during summer. We recommend hand watering plants during the first 2-4 weeks because it is a significantly more effective way to water plants evenly and/or detect plants which go into decline before it’s too late to utilize our replacement warranty.

Weeks Since Planted      Watering Schedule using a Hose@ Full Pressure

1-2                                     Once daily (3-6 seconds)

3-6                                     3x/Week (3-6 seconds)

7-8                                      1x/Week (5-10 seconds)

Weeks Since Planted        Using Irrigation System

1-2                                         Daily watering at half of normal watering time(Twice daily during Summer heat)

3-8                                        3x/week (regular watering schedule)

*Increase frequencies of watering to daily to compensate for additional water loss from temperatures above 85*F. Decrease frequencies of watering to compensate for lack of water loss during temperatures below 45*F

Read more...
Sod Installation Springfield MO

Grass Watering for Sod-Seed

Click Here To Download Grass Watering for Sod-Seed

How to Water Your New Sod and/or Grass Seed

  • For temperatures above 85oF increase frequency of watering not the length of the watering times
  • During periods of cold weather (45oF and below) the watering cycle can be decreased to once a week or once every other week
  • Water less than prescribed below when there are significant amounts of rainfallon the seed or sod
  • If there is excessive rainfall you may skip a water ingcycle as long as the ground is sufficiently moist
  • Touch the ground with your hands or bare feet to feel for excessive moisture and/or dry/hard ground
  • This is the best way to determine watering needs
  • If the ground is squishy, you sink in, or it splashes water and mud when patting your foot on the ground, don’t water for that day.
  • If the ground is hard or dry to the touch, it can be watered
  • The key to establishment is to keep the soil around the root system moist
  • The best time of day to water is between 4-8 a.m.(this will minimize your chances for disease development in new sod) and it is the time of day when up take of water and nutrients is most active

Weeks Since Planted     Watering Schedule using a Hose

1-2                                     Once daily (3-6 seconds) per sqft

3-6                                      3x/Week (3-6 seconds) per sqft

7-8                                      1x/Week (5-10 seconds) per sqft

Weeks Since Planted       Using Irrigation System

1-2                                      Daily watering at half of normal watering time(Twice daily during Summer heat)

3-8                                    3x/week (regular watering schedule)

* Continue watering as outlined for light rain events

Read more...

Tree Watering Practices

Click Here To Download Tree Watering Practices

Tree Watering Practices

How to Water Your New Trees

There are many exceptions to the following guidelines. Species-specific research is encouraged for customers interested in the proper maintenance of their trees.

Trees prefer a larger volume of water, provided a little less frequently, relative to smaller plants. The key to establishment is to keep the soil around the root system moist. The root system is generally 12 to 18 inches deep on most trees. A slower deeper watering is more effective at reaching 12 to 18 inches deep.

Over watering can push all of the oxygen out of the soil and actually choke a plant to death faster than underwatering will kill the plant of dehydration. Be sure water is draining from your plant so it isn’t sitting in a puddle of water for an extended period of time after watering. Poorly draining soils will require much less water than outlined below. Touching the ground and feeling the soil moisture at the base of your tree is always the best way to determine watering needs.

Avoid letting water splash on the leaves of your tree, if possible. The best time of day to water is between 4-8 a.m. After the initial establishment, trees should be watered once or twice a month for the first 1-2 years, even during the winter, if/when weather permits, and especially during summer.

We don’t recommend relying on a lawn irrigation system to adequately water your trees. While the in-ground sprinklers will reduce water needs, trees will still need supplemental watering from a hose.

Weeks Since Planted             Frequency/Durationusing a Hose

1-2                                              Once daily @ 20-30 seconds/tree

3-6                                              3x/Week @ 20-30 seconds/tree

7-8                                              1x/Week @ 30-60 seconds/tree*

Increase frequencies of watering to daily to compensate for additional water loss from temperatures above 85*F. Decrease frequencies of watering to compensate for lack of water loss during temperatures below 45*F.

Read more...

Adding a tree into your Landscape

Click Here To Download Adding a tree into your Landscape

3 Considerations When Adding a Tree to Your Landscape

1.)How Trees Are Measured and Sold

Trees are typically measured for sale using 3 different methods: “Pot/Container size” (in gallons), “Height” (in feet; or in inches for small trees), and “Caliber” (in inches). Caliber is the diameter of the tree trunk, measured at about 6 inches off the ground. Sometimes trees are also measured using the Diameter at Breast Height (also known as “DBH”), but typically DBH is used for tree analysis purposes.

Trees are often sold in ball and burlap form or “B&B”. B&B trees can be measured using height or caliper. Trees are also sold in containers or pots which can be “container-grown” or “containerized.” Usually trees in containers are measured by the number of gallons their potholds. However, it is also perfectly normal for tree farms or nurseries to measure their trees in containers using caliper or height.

The industry standard for most trees would be 6 feet tall, 1-1.5” caliber, or a 15-gallon container. Rarely is anything easy to compare when dealing with plants. Actual sizes, heights, and caliberscan significantly vary based on species, grower, supply/demand, recent weather events, and many more factors.

2.)The Best Time to Plant Trees in Missouri

The best time to plant trees in Missouri is usually October through March. That said, most trees in our area can be planted all year long. Summer planting can create more difficulty establishing the roots of the tree, but proper watering is all it takes to keep trees alive.

3.)Placement & Space Requirements

Some trees grow different heights and widths based on the region in which they are located. It is important to know the mature size of your trees. Certain trees should not be planted nearoverhead power lines, concrete driveways/sidewalks, or the house’s foundation. On the other hand, some trees are small enough to grow under power lines, near concrete, and next to a house.

Locating trees in a spot with adequate space relative to their growth habit is essential to long-term health and wellness. Too much competition can prevent a tree from acquiring appropriate amounts of nutrients, water, and oxygen due to restricted areas for root growth and nutrientuptake. This lack of space leads to extra stress on the plant. Plant stressors can facilitate insect infestation and disease development. Adequate space and airflow make a significant difference in the quality of life for a tree.

Putting plants too close together also limits airflow. The lack of air movement prevents foliage and roots from drying out, which increases the plants susceptibility to fungal diseases

Read more...

Fall Aerating and Over-Seeding

Click Here To Download Fall Aerating and Over-Seeding

Fall Aerating and Over-Seeding

What is Aeration and How to Prepare for Aeration and Over-seeding?

“Aeration” or “core aeration” is the process of exposing your soil to the air by removing plugs of soil from the turf. This basic maintenance practice improves soil structure. Soil structure significantly impactsthe availability of the critical elements of plant life in a soil. These critical elements (oxygen, water, and nutrients) are more readily available in a regularly aerated area. Over time, aeration increases the quality and health of grass and trees during by promoting thicker and deeper root growth.

Most lawns in our area should be aerated once a year. A lawn experiencing heavy traffic or extensive soil structure damage may need to be aerated twice a year for the first few years in order to maintain a quality soil structure.

How to Prepare for Aeration & Over-seeding:

Look for the utility markings in the yard & mark your private lines

  • We have public utilities marked through MO-One Call (1-800-DIG-RITE) to avoid shallow telecommunications lines
  • Place flags or spray turf-safe paint on any irrigation heads not along a curb or concrete edge, AND on invisible dog fences, OR on any other private underground lines

Make sure ground is soft for best results

  • Try to water the day or two prior to aerating service if ground is very dry and hard
  • Please don’t water the day of aerating services
  • “Soaked” and “soft” are not the same

After Aeration and Over-seeding:

  • Water in grass seed immediately following aerationAfter Aeration and Over-seeding:
  • Continue normal watering schedules until the beginning of November (if weather permits)
  • Leave the soil plugs on the lawn because they break down and filter back into holes left by the aerationmachine
  • Mow yard once or twice during the first 8-10 days after seeding
  • Avoid mowing and other traffic on lawn for the following 10-14 days after the initial 8-10 day period post-seeding
  • Regular mowing can resume around the 3rd-4th week following aeration (it is recommended to skipmowing for a week or two during the 2nd to 3rd week following seeding
  • Don’t expect instant results: Aeration and Over-seeding starts to make the most visual impact after two or three years of Fall aeration and over-seeding.
  • If you were aerated and over-seeded towards the end of the Fall “seeding window,” expect to see your results in late Spring, early Summer.
  • If you were aerated and over-seeded during the Spring “seeding window,” expect to see your results early Summer or when it cools down in the Fall. Often times Spring aeration and over-seeding is performed more for soil structure improvements than for seed establishment.
  • It is rare to see great results the same season the service is provided.
  • The results of regular annual aeration are cumulative, so consistently performing this maintenance to a lawn area is critical to achieving sustainable results.

If for some reason after aerating and seeding and you did not get the results you wanted, there could be an underlying issue such as: high traffic, pest problem, your soil pH won’t release nutrients properly, your soil is still overly compacted, thatch buildup, etc. Call and schedule a free consultation/estimate to address any of your lawn or landscaping concerns.

Read more...
Worth The Wait For The Best Landscaping Companies in Springfield MO

Worth The Wait For The Best Landscaping Companies in Springfield MO

The first two questions we usually get asked whenever someone calls us  about a landscaping job whether it is Springfield , Nixa Ozark or Branson is “How soon can you get here to give us a quote?” and “How quickly can you get started?” We try to be very transparent up front that it can take a week or two for us to come out for a bid and once we get the go ahead from the property owner, it can take us another 8 to 10 weeks to get your job started. Why does it take us so long? There are a few reasons.

For starters, if someone is sitting around waiting for you to call them and can start on your job right away, that’s generally going to be a red flag. Unless they are a brand new company or a big project recently fell through, there should be a steady pipeline of work lined up for the best landscaping companies in Springfield MO. Because of Gabris Landscaping has a solid track record of providing quality work for our customers, we’ve got a pretty steady backlog of work to complete.

Next, it takes time to do a job the right way. We aren’t the cheapest or the fastest landscapers in town, but we stand behind our work and will only take on quality jobs that we can be proud of. So if you care more about how quickly or cheaply the job can get done, then we’re probably not the landscaping company for you.

But if you realize that your home is your most valuable asset and it’s worth the investment of money and time to get the job done right the first time, then we’re confident that the landscaping experts at Gabris Landscaping will be worth the wait.

Idea Generation

Our experienced landscape designers have loads of ideas from the many years of experiance working in the industry as your local landscaping company. Our ability to be abundant with ideas and to spin one idea into a new and improved idea using our past experience and industry expertise is a unique talent of our design professionals.

Site Analysis

If you are a local to Missouri you will know that every parcel of land is unique. Our professional landscape designers have the skills to understand all the minor details that come together to dictate the broad-brush strokes of design. We have the refined talent to define the unique elements of each area of focus.

Conceptual Design

Once there is a clear analysis of your project site, we will come up with conceptual design ideas to contemplate. Every site has multiple solutions, but when the background research has been done thoroughly, our professional landscape designer will narrow down the options to a concept that answers the needs, wants and wishes of the property owner while addressing the characteristics presented in the existing landscape.

Construction Planning

Landscape design is about more than just ideas. By working with our seasoned professionals, you can be assured that what we develop together will have the ability to not only be built, but also to be sustained.

Budget Creation

Understanding what things cost is very important. Once the direction and aesthetic is defined it is necessary to bring the project into the reality of money. Your professional landscape designer will be able to reasonably provide a budget you can count on. We can also help you determine whether it makes sense to build the project all at once or to phase it in.

If you have a landscape project bubbling up in your imagination, think about contacting the professional landscape designers at Gabris Landscaping to help you develop and refine your ideas into an actionable plan. We’re confident that the end result will be worth the wait.

Read more...
CALL US TODAY!
Call Now